Envelopes: New Feature
Using RE-Sure Sign Envelopes:
RE-Sure Envelopes are a powerful toolset that already has great capabilities and soon will be even more powerful! This short tutorial explains what Envelopes do, and how to use them for the most impact!
What are Envelopes?
Ever get multiple .pdfs that need to be signed and don’t want to enter the signer data, or other fields manually, and track the signatures for each one manually??RE-Sure Sign Envelopes accelerates this process and makes this easy!RE-Sure envelopes are most powerful for multiple .pdfs that need to be signed.
RE-Sure Sign Envelopes gives you the power to enter all the signers once, and also has the power to create date and Text attributes (like address, closing date etc.) so you don’t need to type these in multiple times.Keep reading to see how to do use envelopes!
How to Use RE-Sure Sign Envelopes:
Open RE-Sure and go to Tools/RE-Sure Sign.A new tab on your browser will open. You don’t need to keep opening this tab, it will stay there till you close it at lets you work in regular RE-Sure

independently!
Go to the top right corner and select folder view.This more like your familiar finder or explorer

view on your computer!
Envelopes are shown as green envelopes in this view

To create an envelope, you will need at least one file to upload in your folder.
Select the “Create Envelope at the top of the screen”
Title the name of your envelope, click to add signers (you can manually enter names/emails,

select from your contacts, or add yourself as a signer.Add at least one file
This creates your folder.You can upload more if you like!
Access the Envelope through the 3-dot menu on the right:
Here is where you can see the power of an envelope!
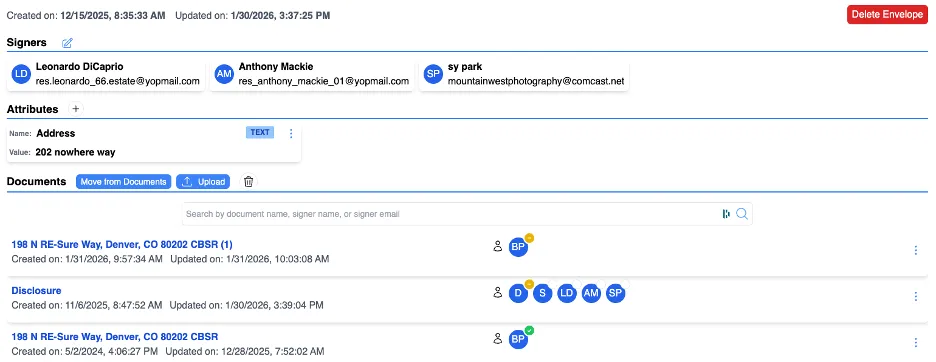
At the top you can see all your signers.You can add more (or delete) by clicking the pen icon🖊️
Attributes are next:Attributes are Prefilled out text or date blocks that let you define parameters you want to user in each form, like an address, or a closing date. Just add/create an attribute and when you add a text or date block, these are available for you to use. No more typing in this data multiple times.
Documents:Documents list out all documents in your envelope. Here you can move documents that are in other folders or in RE-Sure, you can also upload more or find documents you have deleted in the trash can.
Once your document(s) are ready to send, go to the 3-dot menu and select send document.All your documents, and all your signers will be available for your email.
RE-Sure Sign will also track the status of signatures with:
a.white: Not sent,
b.Orange: Sent, viewed, but not signed,
c.Green: sent and signed,
d.Red: Sent, not viewed, not signed

You are now on your way to try out ENVELOPES…
